
Stealth LED Light Bar Install
How to: Install your new Stealth LED Light Bar by DRZ Off Road.
The Stealth LED Light Bar is by far our very favorite product for the 4Runner yet! Most others that are "hidden" behind the grill are chrome, making them not so hidden, at all! Our light bar is completely black! You can hardly even tell it's there!
Today we will be going over the steps to install the Stealth Light Bar behind your grill.
TRD Jon's Install and Review:
<iframe width="560" height="315" src="https://www.youtube.com/embed/2IqlqrLevMk?si=pyK6Op2phKKJS8Hg" title="YouTube video player" frameborder="0" allow="accelerometer; autoplay; clipboard-write; encrypted-media; gyroscope; picture-in-picture; web-share" referrerpolicy="strict-origin-when-cross-origin" allowfullscreen></iframe>
Things worth noting:
- This installation is with a Pro grill, however, can also be done with an SR5/Trail/Off Road grille just the same
- Please read this complete tutorial before beginning installation
- The hood release latch will rub slightly on the top of the light bar. Slight bending may be required.
- Precise alignment of the Light Bar is dependent upon the skill of the installer and may require the addition of metal washers or spacers to the base and/or trimming of plastic pieces
Installation
- Difficulty - Medium/Hard
- Time Required - 1-2 Hours
You will need
- An electric drill
- 14mm wrench
- Flathead screwdriver
Step 1:
Open the hood and remove the radiator cover. Do not use a flat head screwdriver to remove the clips, instead, push down on the center of the clip and it will release.

Remove this center screw attaching the grill to the frame and pop out these two top clips (these ones you normally have to pry with a screwdriver).

Remove the front bumper piece, make sure to release all the plastic tabs as to not break any of them. If you are having to force it quite a bit, then there are tabs that still have not been released. (The two on the end are the trickiest to reach)

Step 2
Remove this centerpiece from the grill. It is attached by 4 screws here. You will not be reattaching this when reassembling.
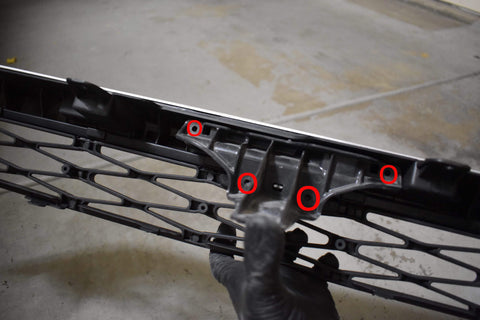
Remove the corresponding piece that is attached to the frame. this will also not be reattached.

Step 3:
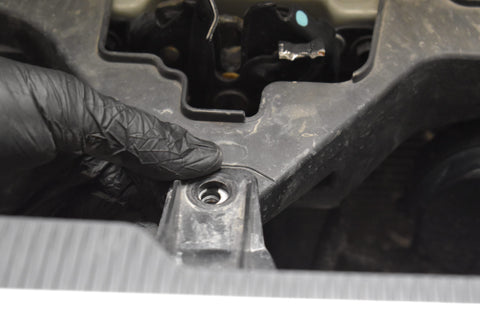
Now that everything is out of the way, test the positioning of your light bar. Mounting to the very top of this front bar will not work as the Light Bar will be too high for the grill to be reattached. We found the best spot to mount it is on the lower backside of the bar at the bend.

This mark is the center of the grill, make sure you drill holes the same distance from this center point.

Our drilled holes are placed 29cm apart and 14.5cm from the center directly at the curve. Mark your holes and drill.

Find the center of your light bar, slide the mounting brackets so that the center screw is the same distance from the center as your drilled holed are from the center (In our case 29cm apart and 14.5cm from the center) and tighten the small hex screws with the hex wrench provided with the light bar.

Step 4:
Now it is time to mount the Light Bar. First, place the base to the holes you just drilled like so (scroll down and look at the few tips for precise alignment before continuing) twist on the screw but only part of the way to allow for some play.
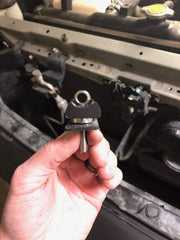
Once the base is on, insert the metal pins to the base of the light bar but only part of the way. Place the light bar on top of the bases attached to the frame. Getting the light bar past these plastic pieces can be tricky and may require a bit of force and maneuvering.

Once you have the light bar on top of the bases, push the metal pin through the eye of the mounting bolt. You may have to push the mounting bolt up from the bottom and do some twisting in order for it to line up.


Step 5
Now that the light bar is loosely attached, place it in the position you would like it to be permanently and tighten the nut on the bottom of the mounting bolt.

Alignment Tips:
A perfect 90-degree angle (light bar facing straight forward instead of angled upward slightly) is dependent mostly on the location of the drilled holes. Even with perfectly drilled holes alone, some further altering may be necessary for a 90-degree angle. These following tips will make a complete 90-degree angle possible.
- (Suggested) Some of our customers have placed a 1/4 inch spacer between the mounting base and rubber spacer like so. This raised the light bar sufficiently to angle it as desired.

This spacer is from Home Depot (click here)
- An additional way to gain more clearance is to shave this plastic down. We suggest using a spacer over this solution as this will only give you a small amount of additional space to alight your light bar.

Step 6
Now it's time to wire the LED Light Bar. Many of you may have auxiliary lighting already set up and already know how you would like to wire your new LED light bar. For those of you who do not have this or want to set it up, you can proceed with this step.
We prefer to wire our LED Light Bars directly to our high beams. We prefer this because it is quite simple to do and we have found that whenever we have our light bars on, we also have on our high beams and vice-versa.
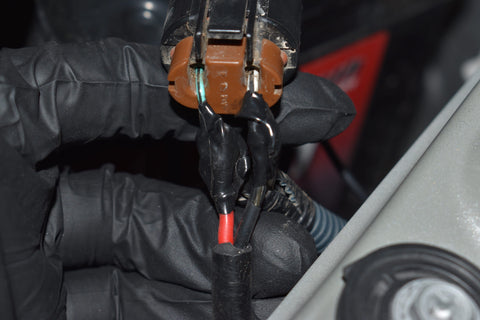
To do this, locate one of your high beam connectors and disconnect it from the bulb (we suggest using the driver's side bulb as this will be closer to the light bar wire connector). There will be a white and green wire. Strip both wires a bit back. before soldering, plug in the light bar's wires to make sure they will reach, a wire may need to be added in the middle. Solder the red wire from the light bar to the green wire of the high beam and the black wire from the light bar to the white wire of the high beam.
Reassembly
Reassemble your grille in the exact method you used to remove it as well as your radiator cover. You will not be reassembling the 2 center plastic pieces that attached the grill to the radiator/frame. You may also need to trim this piece of the grill to allow space for the Light Bar. This is very easy to do and can be done with wire cutters as the plastic is soft.


